Spaces & workspaces
This TSI is to set up your property portfolio and the related floors, spaces, and workspaces.
Properties
It starts with creating your property table. The property table has a hierarchy of three levels. In Planon Workplace Edition you can create:
• Site
• Building
• Terrain
Each type of object has its own set of data fields. In general, they are the same, but there are some differences. In this document we will focus on the type Building.

Most of the fields are self-explanatory. The following fields are explained in detail:
• City: Choose a city from the list (Base data (space) > Cities)
• Country: Choose a country from the list (This list holds all possible countries including the Country code)
• Time zone: Choose the time zone that is applicable for the building (This is a predefined list of all possible time zones).
• Max allowed people: Define the number of Maximum allowed people in the building. This data is used when using People flow sensor on building level.
• Environmental profile: Define which Environmental profile is applicable for this building. When empty, the default Environmental profile will be used. When multiple profiles are available, choose the one that is applicable for this building. (User group Building Admin: Base data > Profiles & targets).
• Calendar: Define the Company calendar that applies to this building. When empty, the default calendar will be used. (Base data (space) > Calendars).
Components
The selection level Components holds the following selection steps:
• Floors
◦ Define for each building the floors that are available in the building. When adding a floor define the following:
- Reference date (See Reference date)
- The building
- The floor (there is fixed list available)
- The name of the floor is auto populated based on the description of the chosen floor
- Floor sequence is auto populated by the chosen floor (for example, 3rd Basement floor = -3, 6th floor = 6)
- Start date (based on set reference date) or can be changed on ‘Floor attributes’
- Max allowed people: Define the number of Maximum allowed people on the floor. This data is used when using People flow sensor on floor level. This can be added/adjusted on ‘Floor attributes’
- Font sizes: Here you can define the font sizes for the different attributes in the drawing. This will result in a better view of the data on the floorplan.

◦ You can view details of the floor via data view or the floor in CAD integrator view:

Space categories
In this selection step you can group spaces based on the required cleaning work program - for example office and sanitary spaces.

A space category can be linked to a space to group and report on it. This is used in for example:
• Planon Workplace Insights Dashboards
• CAD Integrator > Space mapping
Space types
In this selection step you can view or enter spaces with a specific type of space usage – for example offices, warehouses, or conference rooms.

A space type can be linked to a space to group and report on it. This is used in for example:
• Planon Workplace Insights Dashboards
• CAD Integrator > Space mapping
Departments
With this selection step you can filter spaces by department.
As Space & Reservations manager you can adjust this list. The departments table has a hierarchy of max 10 levels.

A department can be linked to a (work-)space to group and report on it. This is used in for example:
• Planon Workplace Insights Dashboards
• CAD Integrator > Space mapping
Cost centers
With this selection step you can filter spaces by cost center. Cost centers are units like departments which are used in cost accounting and to which costs can be charged.
As Space & Reservations manager you can adjust this list. The cost center table has no hierarchy.

Space standards
In this selection step you can select spaces according to a hierarchical system of space standards. You can edit the main space standard and make changes to the hierarchy as required. By default, the Edition has the BOMA, US Standard list:

The selection level Spaces holds the following selection steps:
Spaces
You can view details of the space via data view or the floor in CAD integrator view:
When a floor is created and linked to a property, spaces can be imported via the Cad Import (see CAD Integration). Advised for all Edition customers is to have the CAD Drawing be the source of all spaces that need to be in the application.
When spaces are created via CAD Import, some data fields need to be populated so that information can be used for reporting and dashboards.
On space level, the following is possible:
• Add, change Space number (Advise not to do so if CAD drawing is the source)
• Add, change name
• Upload an image related to the space
• Finishings, e.g. Floor-, Wall- and Ceiling finishes
• Actions available:
◦ Generate a QR code

◦ Go to: These are steps that lead you to another table with specific data related to the selected space.
- Bookable unit
- Measurement point
- Space occupants
◦ Add, Copy, Delete, End, Resume space (Advise not to do so if CAD drawing is the source)
◦ Modify space usage: When selecting this action, it will ask for a modification date. This means that the change is applicable from that date. This can be in the past, today or in the future. The following fields can be adjusted via this action:
- Department
- Cost center
- Space category
- Space type
- Space standard
- Space capacity
Floor attributes
When a floor is created on Floor attributes some changes can be made. After a CAD Import of a floor (creating spaces) it will also display the Drawing locations used for the import.
On Floor attributes the following is possible:
• Change the start date of the floor.
• Add the number of Maximum capacity.
• Define the font sizes.
Workspaces
Usage
This is the area where you can change specific usage of a space (via modify within selection or one by one). For example, changing the following data fields:
• Code
• Start date
• Give an end date
• Change net area
• Department
• Cost center
• Space category
• Space type
• Space standard
• Space capacity
Dimensions
Certain dimensions might be applicable to maintain.
• Volume (fill in manually or it is auto populated based on value Clear height.)
• Clear Hight (when added value, it automatically calculates and populates the field Volume. If there is a value in the field volume it will be overwritten)
Workspaces
You can view details of the workspace via data view or the floor in CAD integrator view:
When a space is created via the Cad Import (see CAD Integration) and workspaces are within that space, they will be created on the selection step Workspaces. Advised for all Edition customers is to have the CAD Drawing be the source of all workspaces that need to be in the application.
When workspaces are created via CAD Import, some data fields need to be populated so that information can be used for reporting and dashboards.
On workspace level the following is possible:
• Add, change code of the workspace (Advise not to do so if CAD drawing is the source)
• Add, change name.
• Actions available:
◦ Generate a QR code

◦ Go to: These are steps that lead you to another table with specific data related to the selected space.
- Bookable unit
- Measurement point
- Workspace occupants
◦ Add, Copy, Delete, End, Resume workspace (We recommend not to do so if CAD drawing is the source)
◦ Modify
- Workspace details
- Occupancy data (only possible when related space is set to ‘Assignable’.
◦ Make reservable
- When made reservable a Flexible workspace (Also a reservation unit) is being created.
- Use the ‘go to’ action to navigate to the related Flexible workspace

◦ Make unreservable
- When you want to set a reservable desk to a non-reservable desk you may get this error message:
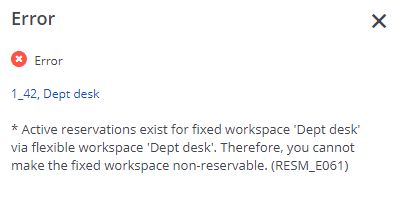
When you go to the reservable desk and complete or cancel all reservations of this desk and archive them, the error does not appear again.
1. Select reservable desk
2. Go to Bookable unit
3. Navigate from reservation unit to bookings
4. Complete or cancel all related bookings (one by one or via action on selection)
5. Archive all related bookings (one by one or via action on selection)
6. Go back to the reservation unit / bookable unit
7. Go to Workspace details
8. Make unreservable
History
History is a table that contains data that relates to the selected record and what changes have been made in the past:
• When?
• By whom?
• Related record
• What field has been changed?
• Old value
• New value
Occupancies
When a space is assignable you can assign people to the space or to a workspace. The following fields can be populated:
• Space
• Workspace (when workspace is filled in the space will automatically be populated with the related space of the selected workspace).
• Start date.
• Proposed end date (when no end date, it will be assigned until a date has been given)
• Owner (employee from the personnel list)
• Position (Auto populated when data is linked to person in Personnel table)
• Required area (Auto populated when data is linked to person in Personnel table)
• Department (Auto populated when data is linked to person in Personnel table)
• Cost center (Auto populated when data is linked to person in Personnel table)
• Occupancy rate (by default 100 but can be changed)
• Define which day is a working day.
◦ by default, Monday to Friday = working day
◦ by default, Saturday and Sunday = non-working day
Usage
Also known as the Workspace details. Here you can change the following fields:
• Space
• Available area
• Start date
• Department
• Cost center
• Workspace type (base data
• Capacity (multiply by 100)
◦ When capacity of desk is 1 person populate field with 100
◦ When capacity of desk is 4 persons populate field with 400
Actions available:
• ‘Go to’ Personnel (navigate to the personnel record of the related person to the selected workspace occupancy).
• ‘Go to’ Workspace (navigate to the related workspace of the selected occupancy)
• Add, Copy, Delete